Last night I learned a few new things about myself.
1) Crafts are fun.
2) Art takes lots of work.
And most importantly:
I am creative and so is everyone else!
I don't think it's possible for anyone to NOT be creative (yes, I know... the double negative was purposely added to prove a point)
If you know me, then you already know that I struggle with my creativity.
My idea of a creative project is a paint by numbers set with all of the colors already decided.
I think the hardest thing for me to understand is how any object can be important or valuable without also having a concrete, practical purpose.
But don't mistake my misunderstanding for a lack of appreciation.
I don't believe that art is useless and I don't think that the world would be better off without it.
Quite the contrary.
I think a lot of that has to do with my artistic family.
They make it all look so easy.
For me creativity and the arts sit in the same place as the sciences.
While I don't understand how things happens, I am in awe of all the complexities. And I respect anyone who has taken the time to create and understand what I can't.
BUT enough of my ramblings.... on to the craft!
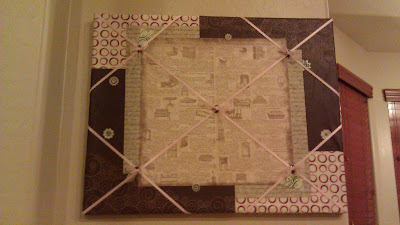
My mom & I made this!
It turned out great, I love it!
In case the picture isn't showing up well for you, or you aren't sure what it's a PHOTO COLLAGE BOARD (at least according to my quick google search)
Just for fun I'll also be posting directions if anyone is interested in making one too :)
STEP ONE: Materials list
a) 1 piece of canvas (mine was 16x20 or 20x16 .... I'm not really sure how measurements are told)
b) As many sheets of design paper (or material depending on your preferences) that you want.
I used 6 pieces of nice paper from the local craft store because I wanted to make it kind of funky and unique.
c) At least 1 type of ribbon (how much you need depends on how
d) 1 pair of scissors - to cut ribbon and paper/material
e) 1 bottle of mod podge (it's like Elmer's white glue) - to glue the paper/material, you can also use it to seal the entire board if you're using paper
f) 1 sponge brush
To apply the glue
g) At least 5 small buttons (depending on how many times your ribbon intersects)
I wanted a simple diamond formation so I only used 5 but it's really up to you.
h) At least 8 small tacks (depending on how many intersecting ribbons you want)
I only wanted 5 so I only needed 8 tacks
i) 1 hot glue & hot glue gun
To put the buttons on the paper/material and to attach the ribbon to the paper/material (unless you sew it on but I'm not much for sewing)
j) Stickers or any other creative addition you want!
*** Fortunately we already had the piece of canvas, mod podge, sponge brush, hot gun & glue, ribbon and scissors so I paid less than $10 for the paper, stickers and buttons
STEP TWO: Begin putting together the pattern by placing the bottom layers
Since I used paper instead of material, I glued on the bottom layers page by page.
For this type of glue I put some on the page and on the canvas for added help.

STEP THREE: Add any additional decorations you would like on the top layers
I just put a few stickers on mine to give it some sparkles and pop of color.
**Also if you used paper instead of material you must make sure to apply an even layer of mod podge on top of the entire top surface to seal the layers together.
This also prevents it from being damaged in case of small amounts of moisture and will help it last longer overall.
STEP FOUR: Securely attach the ribbon to the canvas
First I lined up the ribbon evenly to the middle of each side of the canvas and hammered the first set of 2 tacks on opposite sides.
Then I pulled at the sides to eliminate any slack and I hammered another set of 2 tacks through the ribbon onto the wooden canvas border.
Next we nailed another piece of ribbon from corner to corner over the top to create a diamond crisscross effect.
This is done on all 4 corners and pulled tight to keep pictures and mementos secure.
STEP FIVE: Add the buttons
*This is where the hot glue gun comes in so hopefully you have it started and heated.
On each intersecting ribbon I glued on a button, not only to keep it attached but to also prevent any pictures/mementos from falling out.
As you can see I got a bit fancy with my buttons and tied small pieces of sheer ribbon into bows.
But it's all up to you!
And now.....
You are finished!
Ta-da!!
Here is the finished 'product'
It's a homemade masterpiece!
I really enjoyed making this and hopefully it won't be long until I'll have another project to show you.
Of course this is my own design made from the supplies of my local craft store so feel free to experiment and put together something unique!
I'd love to see your ideas!
Before I forget I must say...
THANK YOU for all of your help mom! It was quite the team effort :)
The moral of this story is... although it requires some effort and skill, being creative is fun! But only if you let it :)


No comments:
Post a Comment